Note: This manual is about the Standard Enterpad configuration. Although the configuration tutorial may be enough in many cases, this manual will be helpful to those who want to go beyond the Enterpad basic use.
Index
- Operating principles
- Features
- Specifications
- System requirements
- Installation
- How it works, from electricity to configuration
- Configuration examples
- Configuration file
- Internal operations of the Enterpad
- Technical drawings of the Enterpad
- The Enterpad memory
- Tips
- Technical support
- Notices
- Glossary
Operating principles
Each of the 120 positions on the Enterpad P120 allows for the reproduction of any series of characters available on a standard keyboard. A sequence of letters, numbers, or functions may be obtained by pressing a key on the Enterpad. To achieve this, a file corresponding to the user's needs must be written and transferred inside the Enterpad permanent memory.
The Enterpad key new functions may be represented graphically on an overlay sheet. Cedeq supplies templates to be used with a variety of drawing programs.
Features
- Connects like a standard keyboard
- No special driver required
- Spill-proof; easy to keep clean
- Protection against static electricity
- Reprogrammable 8 or 32 K permanent memory
- Can be password protected
- Can act as a software-protection device (dongle)
- Can be used as a standalone unit or with a standard keyboard
- 120-key soft-touch keypad
- Up to 4 macros per key (can trigger 460 macros)
- Buffer of 12 keys
- Can stop macros while processing
- Programmable transmission delay
- Programmable auto-repeat
- Adjustable beep volume (loud, medium, low and mute)
- Easy-to-use configuration software for Windows or DOS
- Overlay templates available
- No external power supply required
- Overlay sheet cover included
Specifications
- Enterpad P120 dimensions: 19.8 x 25.3 x 3.3 cm (7.8 x 9.96 x 1.3")
- Overlay sheet dimensions: 18.4 x 21.6 cm (7.25 x 8.5")
- Number of keys: 120, 10 X 12 matrix
- Membrane: Sealed with > 1 million contacts per key
- Membrane: Scratch-, dust- and spill-resistant
- Plug(s): USB or RS232 or 5-pin din or 6-pin minidin
- Plug cable length: 1.8 m (6') shielded
- Approx. weight: 710 g (1 lb. 9 oz.)
- Approx. shipping weight: 910 g (2 lb.)
- Operating temperature range: 10 to 35 C (50 to 95 F)
- Storage temperature range: -5 to 50 C (23 to 122 F)
- Humidity range: 5-95 % RH non-condensing
- Current consumption: max. 17 mA = 1/10 watt
- CSA 108.8-M1983 / FCC class A (commercial)
- Available in Beige or Black
System requirements
Note: The required system for an Enterpad configuration is allways more restrictive than the required system for use it.
The Enterpad with a USB plug can be configured from Windows (ME/XP/Vista/7/10/11) and should be usable with all USB-keyboard compatible operating systems.
The Enterpad with Din 5 or miniDin 6 pin plug can be used where this kind of PC keyboard can be installed but may only be configured from DOS, Windows 3.1 and 9x.
The Enterpad with RS232 or RS485 plug can be configured from Windows (ME/XP/Vista/7/10/11) and should be usable with all computers, or equivalent devices, with a RS232 port.
Installation
Hardware
Enterpad with USB, RS232 or RS485 plug:
- Plug in the appropriate socket. A status light should be lit on the Enterpad indicating that the installation is completed.
Enterpad with Din 5 or MiniDin 6 pin plug: (generaly installed between a computer and its standard keyboard)
- Turn off the computer.
- Disconnect the standard keyboard from the computer keyboard port and plug in the Enterpad.
- Plug the standard keyboard in the port located on top of the Enterpad. The Enterpad can also be used by itself provided that it is programmed accordingly.
- Turn the computer back on. A status light should be lit on the Enterpad indicating that the installation is completed.
Configuration Software
Several software packages are available to configure many types of Enterpad from different operating systems (DOS, Windows 3.1, Vista).
Locate and download the appropriate software from: cedeq.com/enterpad/en/standard/configuration-software
Execute the downloaded file to install the configuration software. Note: If the file has a .zip extension, you will have to extract its content to execute the installator.
How it works, from electricity to configuration
A conventional, type AT/Pentium computer is linked to a keyboard with a cable that sends electric signals. The keyboard is then able to transmit numeric codes to the computer. The computer also can transmit numeric codes to the keyboard. Numeric codes range from 0 to 255.
To begin with, a standard computer keyboard and the Enterpad work the same way; if the Enterpad is configured so its key #1 transmits a code to the computer to show the letter "a" on the monitor, it will transmit this numeric code the same way a standard keyboard would. Of course, the Enterpad key #1 could also be configured to transmit a string instead of a character.
When a key is pressed on a computer keyboard, it transmits a numeric code equivalent to the position of the key. The numeric code has no relation with what is written on the key. Other signs or letters can be shown. It all depends if the keyboard is English, French, Belgian, etc...
When this key is released, the keyboard transmits the numeric code 240, which means a key has been released. It is then followed by the numeric code reflecting the position of the key. This is all a computer needs to know. If a key is pressed, held, if another one is pressed without having released the previous one, which one is released, etc...
Here is an image of different transmitted numeric codes, according to their positions on a 101- key keyboard:
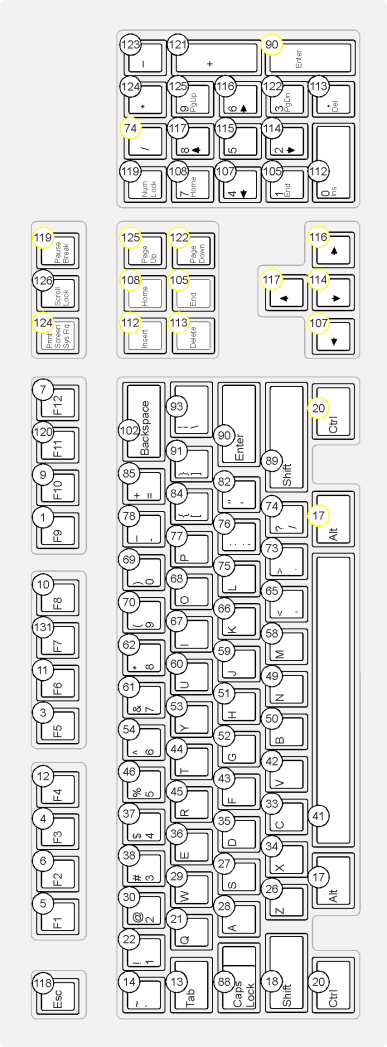
The numeric codes circled in yellow are called extended numeric codes. They are always in front of the numeric code 224.
An adjustment in the computer allows it to compare the numeric codes received from its keyboard, to an internal key and function table, and then act properly. So, if the numeric code 74 is transmitted from the keyboard to the computer, the latter should ask the monitor to show "/". It is true if the computer is set for U.S. English, but it will ask the monitor to show "é" if it is set for French-Canadian.
Remember that it is not possible for the keyboard to know if the computer on which it is linked will show "/" or "é" in the previous paragraph. Keep this fact in mind when ready to configure an Enterpad because, just like a standard keyboard, it works with numeric codes.
With EPConfig configuration software:
The configuration software will convert characters that appear in the configuration file into the appropriate numeral code. Then it transfers them in the Enterpad permanent memory.
The right adjustment of the emulator option in the configuration utility will allow the program to do the appropriate conversion. For example, the physical key used to transmit "#" on the screen is not the same if the computer is set to be used with an american or a french keyboard.
With configuration software other than EPConfig:
The characters used in a configuration file may only contain the ones found on the 101-key keyboard U.S. English. We chose this particular one because of its world wide use. In spite of this, any characters found on any type of keyboards can be programmed, but it is not as simple as the characters found on a 101-key.
The configuration program for the Enterpad will digitize correctly the characters that appear in the configuration file, then will transfer them in the Enterpad permanent memory.
Let us suppose that the Enterpad has to show the "/" on a computer set U.S. English. Because this character appears on a U.S. English type keyboard, only type "/" in the configuration file.
Now, let us suppose that the Enterpad has to show the "é" on a computer set French- Canadian. The character found at this particular location on a U.S. English keyboard will have to be typed in the configuration file. That way, the "/" will be used as in the previous paragraph.
Of course, in both previous cases, the Enterpad will transmit the same numeric codes 74, 240 and 74, equivalent to the pressure and the release of the "/ ?" key on a U.S. English keyboard. The computer will ask the monitor to show the appropriate character, according to its adjustment U.S. English or French-Canadian.
In other words, the "/ ?" key on a standard English keyboard will transmit the same numeric codes series as the "é É" on a standard French keyboard. Again, it is the computer that will ask the monitor to show the appropriate character, according to its adjustment for U.S. English or French-Canadian.
Another distinction is in the keyboard working principle. When you press on a letter, it is the computer, and not the keyboard, that determines if it will be in upper or lower-case letters.
So it was agreed, when the Enterpad configuration program was designed, that the use of the letters "a-z" or "A-Z" in the configuration file, would emulate the same thing.
Configuration examples
It is suggested to execute the configuration tutorial "hello" before reading these examples because it will demonstrate the principles of creation, edition and transfer of a configuration file.
In this section, hello is what is written in the configuration file and hello is what is transmitted to the computer by a configured Enterpad.
Capital letters:
If the EPConfig configuration software is used, just write the letters as wanted. Ex: Enterpad will transmit Enterpad with a capital "E". If the configuration software used is not EPConfig, <shift>e<shift>nterpad will have to be written.
Shortcuts:
To transmit ctrl+c, <ctrl>c<ctrl> will have to be written. The second <ctrl> is necessary to transmit the release of the "ctrl" key.
To transmit more complicated shortcut as win+alt+ctrl+a, <win><alt><ctrl>a<ctrl><alt><win> will have to be written.
Note : The tags <shift>, <alt>, <ctrl>, <win>, <rshift>, <ralt>, <rctrl> and <rwin> are the only ones that require a release. Be careful not to forget to release the tags because the computer will take for granted that one or more of the corresponding keys are still pressed. This is what should be checked if the keys on the Enterpad and the standard keyboard are scrambled.
Function keys:
The use of <f1> to <f24> allows the transmission of the corresponding functions. For example, if <ctrl><f1><ctrl> is written it will transmit ctrl+f1.
Other examples:
The use of the following tags is explicit <tab>, <enter>, <cap>, <up>, <down>, <right>, <left>, <end>, <del>, <insert>.
The use of <eenter> instead of <enter> will transmit enter on the numeric pad instead of the standard enter.
The use of <eup>, <edown>, <eright>, <eleft>, <eend>, <edel>, <einsert> will transmit the extended keyboard corresponding keys which do not depend on the "NumLock" status.
The use of <up>, <down>, <right>, <left>, <end>, <del>, <insert> will transmit the extended keyboard corresponding keys which depend on the "NumLock" status.
The use of 0 to 9 will transmit the corresponding keys of the keyboard top row while the tags <n0> to <n9> will transmit the numeric pad corresponding keys.
The transmission of a space is done by doing a simple space in a configuration file. But be careful to consider the fact that the space must be followed by a character in order to be seen.
Configuration file
The configuration file is created to define the user's needs. It will be compiled and transfered in the Enterpad with the configuration software.
The configuration file must begin by "<000=><delay nnn>". "nnn" can take any value from 0 to 65535. It determines the macro initial transmission speed.
"Enters" are automatically eliminated by the compiler. So, it is possible to extend a macro on more than one line or to extend more than one macros on the same line.
The compiler will consider a space at the end of a line, even if it is impossible to see.
If a key number is not defined, or if it is defined and no macro is following it, nothing will be transmitted.
It is necessary to define two configuration files, which can contain keys from #1 to 230, to configure both Enterpad levels, in other words, 460 possible macro combinations.
Layout of keys on the Enterpad
When a configuration file is created, it is necessary to indicate the location of the keys that will be configured.
The syntax to be used must be <nnn=>, "nnn" being the key to be identified, that is to say a number between 1 up to and including 230.
Key #1 is located at the top left corner and key #120 is at the bottom right corner. The "shift" key of the Enterpad adds 120 more to the key number. Key #1 then becomes key #121, and so on. This provides 110 additional keys. It is not possible to configure keys #231 to 240 located on the bottom row, when used with "shift", because they define the behavior of the Enterpad itself.
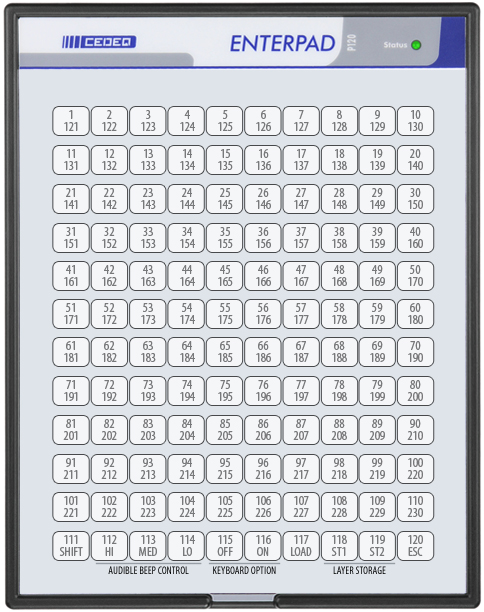
A macro can be created on key #111 even though it is used as the "shift" key. Unlike the other keys, the macro will be executed when it is released if, of course, another key has not been pressed before it was released.
PC keyboard emulation syntax
The following chart can be used as a reference to determine the behavior of a key on the Enterpad. It represents every emulation code on a PC keyboard that can be used in a configuration file.
| Letters and symbols located on the alphanumeric part of a PC keyboard | |
|---|---|
| Letters from A to Z | As is |
| The space | As is |
| Symbols ` ~ ! @ # $ % ^ & * ( ) - _ = + [ { ] } ; : ' " , . / ? | As is |
| Numbers from 1 to 0 located on the upper row | As is |
| The symbol > | <>> |
| The symbol < | <<> |
| Miscellaneous function keys | |
|---|---|
| Back space | <bksp> |
| Escape | <esc> |
| Print screen | <prt> |
| Tab | <tab> |
| Caps lock | <cap> |
| Scroll lock | <scrl> |
| Num lock | <num> |
| Enter | <enter> |
| Enter (located on the numeric part of a standard keyboard) | <eenter> |
| ** Shift (left) | <shift> or <shitl> or <shifl> |
| ** Shift (right) | <shiftr> or <shifr> |
| ** Control (left) | <ctrl> or <ctrll> |
| ** Control (right) | <ectrl> or <ctrlr> |
| ** Alternate (left) | <alt> or <altl> |
| ** Alternate (right) | <ealt> or <altr> |
| ** Windows Logo (left) | <winl> or <win> |
| ** Windows Logo (right) | <winr> or <ewin> |
| Application Menu | <app> |
| F1 to F24 function keys | |
|---|---|
| F1 to F24 | <F1> to <F24> |
| Function keys located on the extended part of a PC keyboard | |
|---|---|
| Insert | <eIns> |
| Delete | <eDel> |
| Home | <eHome> |
| End | <eEnd> |
| Page up | <ePgup> |
| Page down | <ePgdn> |
| Up | <eUp> |
| Down | <eDn> |
| Left | <eLf> |
| Right | <eRg> |
| Keys located on the right-hand side numeric part of a PC keyboard | |
|---|---|
| Num lock | <Num> |
| / | <n/> or <e/> |
| * | <n*> |
| - | <n-> |
| + | <n+> |
| Enter | <nEnter> or <eEnter> |
| 0 Insert | <n0> or <Ins> |
| 1 End | <n1> or <End> |
| 2 Down | <n2> or <Dn> |
| 3 Page down | <n3> or <Pgdn> |
| 4 Left | <n4> or <Lf> |
| 5 | <n5> |
| 6 Right | <n6> or <Rg> |
| 7 Home | <n7> or <Home> |
| 8 Up | <n8> or <Up> |
| 9 Page up | <n9> or <Pgup> |
| . Delete | <n.> or <Del> |
** Must be used in pairs to be released.
How to modify the transmission delay
A macro execution speed may be controlled by using <delay nnn> and <rdelay> in a configuration file.
A configuration file must always start with "<000=><delay nnn>", "nnn" normally corresponding to 25. This is necessary to determine the Enterpad initial transmission speed.
The higher "nnn" is, the slower the transmission speed will be. "nnn" can take any value from 0 to 65535. The value 400 corresponds to about one second delay between each character.
<delay nnn> and <rdelay> can be used anywhere in a configuration file. The last setting will prevail until the Enterpad is powered off.
The <rdelay> asks the Enterpad to put back its transmission speed as indicated at the beginning of the configuration file.
Here is an example: <010=>abc<delay 4000>def<rdelay>ghi
When the key #10 will be pressed, 'a', 'b' and 'c' will appear on the monitor at the pre-set speed. 'd', 'e' and 'f' will appear at the speed corresponding to <delay 4000> and 'g', 'h' and 'i' at the pre-set speed when the Enterpad was powered on.
<delay 4000> will give you a delay of about ten seconds before 'd' appears on the monitor. The 'e' will appear 10 seconds after the 'd', and the 'f', 10 seconds after the 'e'. In other words, there will be a delay of 10 seconds between each letter.
It is important to remember that the last set delay will prevail until it is changed or until the Enterpad is restarted. At that time, the delay will be the one set on the first line of your macro file.
How to make a repetition with a macro
A macro or a part of a macro may be repeated as long as the user keeps holding the key. This three part macro will be activated by an introduction when a key is pressed, as shown in Example A. The macro central part will be repeated until the user stops holding it. The macro will then conclude.
Example A:
<010=>123<RE->456<-PEAT>789
As shown, when the user presses on key #10, "123" will be transmitted, then "456" will appear as long as the user keeps the key pressed, then "789" will be transmitted.
The introduction and the conclusion may also be nonexistent as shown in Example B.
Example B:
<010=><RE-><EUP><-PEAT>
When the key #10 is pressed, the up cursor will be transmitted until the key is released.
Of course, it is possible to achieve maximum flexibility by adding delays anywhere within a macro.
Note: This feature is only available on Enterpads made from 1997 and up.
How to directly transmit a scan code
The instruction <out nnn>, "nnn" being a numeric code between 1 up to and including 240, may be used in a configuration file to ask the Enterpad to transmit a scan code directly.
So, it is possible to have more control on what the Enterpad will transmit, which may be useful at certain times.
In the following example: <001=><out 28><out 50><out 240><out 50><out 240><out 28>
The A key (28), then the B key (50) without releasing the A key are emulated. The macro terminates by releasing B, then A.
Even though it is very unlikely this sequence will be emulated, it would be impossible to do it without the <out nnn> instruction.
For more information about the meaning of the numeric codes, read the "How it works, from electricity to configuration" section.
How to comment in the configuration file
It is possible to write comments in the configuration files by using the instruction <REM XYZ>, XYZ being the comment. The compiler ignores anything that starts by "<REM" until the next ">".
Internal operations of the Enterpad
When they are used in the Shift mode, the 10 keys located on the Enterpad bottom row are used to modify its behavior. The first is the Shift key. The others can adjust the beep, activate or deactivate the PC keyboard, confirm its memory download, choose 1 of the 2 levels of macros saved in the Enterpad and stop a macro.
Shift key
The Shift key on the Enterpad enables the user to have access to 110 more keys and to control 9 internal functions on the Enterpad.

It is similar to the Shift key on a PC keyboard. When it is pressed, the user has access to keys #121 through 240. In other words, "Shift-key #1" is identified by the configuration file as key #121, and so on up to the key #230. Keys #232 to 240 control the internal functions of the Enterpad.
The Enterpad Shift key has a special feature that the Shift key on a PC keyboard does not have. It works just like the other Enterpad keys if pressed, and then released without pressing another key. Unlike the other keys, its macro is executed when it is released.
So, the Shift key may be configured like any other key; it can be used in the Shift mode or both ways at a time.
Adjust beep volume
With the Shift key, three keys can be used to set the beep volume.

The choices are HI for loud, MED for medium and LO for low. The most recent setting will be held in memory until changed, even if the power is turned off.
With or without a standard keyboard
To activate or deactivate a PC keyboard, the keys OFF and ON in the Shift mode must be used. The last adjustment will be valid until further changes, even when the power is cut off.

Usually, it is important to set OFF if the PC keyboard is not plugged into the Enterpad. So, when it is powered on, the Enterpad will electronically exchange data with the computer, instead of the PC keyboard, which is necessary to start up correctly.
Download confirmation
When used in the Shift mode, the LOAD key allows the macro files download in the Enterpad memory. Its use can be required to confirm a macro file transfer in the Enterpad.

How to choose one of two layers
The Enterpad can store up to two macro layers in its memory. By pressing one of the two keys, 1 or 2 in the Shift mode, the user is able to select which layer will be active. The layer 1 will be the default layer when the computer is powered on.

How to interrupt a macro
The ESC key, when used in the Shift mode, allows the stopping of a macro being executed.

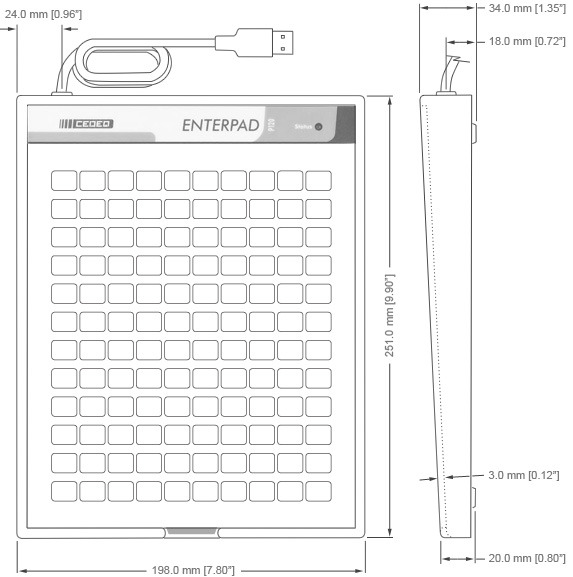
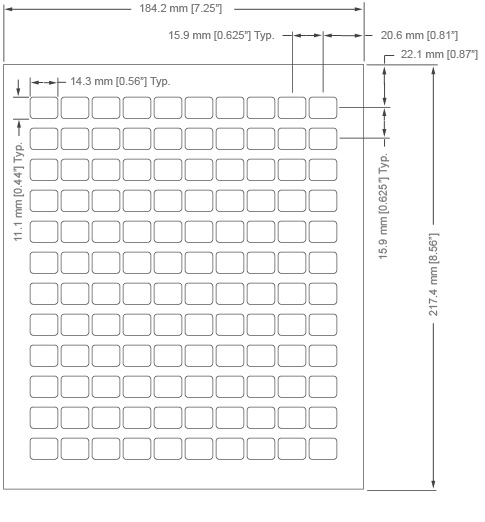
Technical drawings of the Enterpad
Overall Dimensions
Overlay sheet dimensions
The Enterpad memory
The Enterpad has an internal, permanent memory of 8192 bytes. The space is shared by 460 keys, on both of its layers. The Enterpads made before 1995 were using a battery integrated in the memory circuit, with an expected life of about 10 years, when used in a normal temperature environment. The Enterpads made since 1995 are using a new technology, without batteries, able to keep data for several decades.
Tips
In order to ensure optimal use of your Enterpad, the overlay sheet must be correctly lined up with guides on the protective film. The use of a relatively light weight paper will determine the degree of sensitivity needed to activate a key. Pressure should be applied near the center of the key.
Since the key "Num Lock" changes the status of <home>, <pgup>,...on the numeric keypad on your standard keyboard, it would be best to use keys like <ehome>, <epgup>, etc. in a configuration file.
Technical support
If you have any questions, comments, problems or suggestions concerning this product, write to:
Cedeq Industries Inc.
5193 Montee St-Hubert
St-Hubert, Quebec
J3Y 1V8, Canada
Tel: (450) 462-3988
Fax: (450) 462-3988
Web: cedeq.com
E-mail: support@cedeq.com
Notices
The Enterpad™ software copyright
Copyright © 2006-2024 by Cedeq Industries Inc. All rights reserved. The Enterpad software is protected by Canadian copyright laws and by International Agreements.
Limited warranties
Cedeq Industries guarantees the Enterpad against defects in material or workmanship for a period of one year from the date of purchase.
If the unit fails to work properly when used under normal conditions, we will repair or replace it free of charge. The defective Enterpad should be returned securely packaged and insured with postage prepaid and a copy of the sales slip from the vendor.
This warranty replaces all other warranties, either expressed or implied. Cedeq does not guarantee or make any representations regarding the use of the Enterpad in terms of conformity, accuracy, and durability.
Conformity
The Enterpad meets Canadian and American standards (ACNOR 108.8-M1983, code FCC, section 15-1989) with respect to electromagnetic radiation emissions for class A apparatus. Testing was done in conformity with ANSI C6.4-1991 procedure requirements.
Glossary
Compiler
The compiler is a program automatically called by the configuration software before the configuration file download in the Enterpad.
The main job of the compiler is to digitize the characters in the configuration file that can be transmitted directly into the Enterpad.
Macro
A macro consists of one or more characters or functions, defining the behavior of a key on the Enterpad.
PC
PC stands for "personal computer". In this document, "PC keyboard" is used to define a computer standard keyboard and not the Enterpad keyboard.