Index
- Product overview
- Features
- Specifications
- System requirements
- Installation
- Layout of keys on the Enterpad
- Internal operations of the Enterpad
- Tips
- Technical support
- Notices
Product overview
With 120 control keys, the Enterpad can quickly and accurately trigger dozens of well-identified shortcuts without using keyboard hotkeys.
Simply connect the Enterpad to a computer (via USB) to launch any shortcut created in ShortKeeper. With a surface area that is smaller than a sheet of paper, and with the thickness of a standard keyboard, the Enterpad will fit right in with any workstation.
Features
- Connects like a standard keyboard
- No special driver required
- Spill-proof; easy to keep clean
- Protection against static electricity
- Triggers shortcuts without using keyboard hotkeys
- Can be used as a standalone unit or with a standard keyboard
- 120-key soft-touch keypad
- Up to 4 shortcuts per key (can trigger 460 shortcuts)
- Buffer of 12 keys
- Adjustable beep volume (loud, medium, low and mute)
- Overlay templates available
- No external power supply required
- Overlay sheet cover included
Specifications
- Enterpad dimensions: 19.8 x 25.3 x 3.3 cm (7.8 x 9.96 x 1.3")
- Overlay sheet dimensions: 18.4 x 21.6 cm (7.25 x 8.5")
- Number of keys: 120, 10 X 12 matrix
- Membrane: Sealed with > 1 million contacts per key
- Membrane: Scratch-, dust- and spill-resistant
- Plug: USB
- Plug cable length: 1.8 m (6') shielded
- Approx. weight: 710 g (1 lb. 9 oz.)
- Approx. shipping weight: 910 g (2 lb.)
- Operating temperature range: 10 to 35 C (50 to 95 F)
- Storage temperature range: -5 to 50 C (23 to 122 F)
- Humidity range: 5-95 % RH non-condensing
- Current consumption: max. 17 mA = 1/10 watt
- CSA 108.8-M1983 / FCC class A (commercial)
- Available in Beige or Black
System requirements
- One available USB port
- ShortKeeper and/or AutoHotkey
Installation
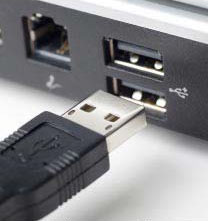 Connect the Enterpad to a free USB port on the computer. If a USB hub is being used, connect the Enterpad to the hub.
The operating system will automatically detect the Enterpad (normally < 15 seconds). Once detected, a notification will appear in the taskbar near the clock. The Enterpad will then be ready to use.
When ShortKeeper launches, it normally starts AutoHotkey (the shortcut processor), which tries to detect the Enterpad. If no Enterpad is detected, or if the Enterpad is already in use by another application (e.g. EP2VBA, EPConfig), AutoHotkey will only let you trigger shortcuts with the regular keyboard. Restarting AutoHotkey will cause it to try to detect the Enterpad again.
Layout of keys on the Enterpad
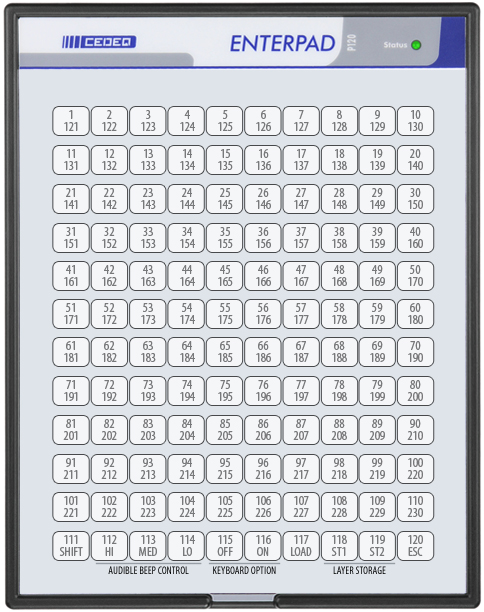
Each key on the Enterpad triggers a corresponding shortcut number in ShortKeeper.
Key #1 is located at the top left corner and key #120 is at the bottom right corner. The Shift key on the Enterpad adds 120 to the key numbers. Thus, key #1 becomes key #121, and so on up to #230. This provides a way of triggering 110 additional shortcuts.
A shortcut can be run with the key #111, although it is also used as the Shift key. The shortcut will be run when the key is released, if another key has not been pressed first.
Internal operations of the Enterpad
By default, the 10 keys on the bottom row of the Enterpad are used like other keys. This chapter explains how (and why) they can be used to do double-duty.
Shift key
The Shift key on the Enterpad enables the user to trigger 110 more shortcuts (#121 to #230). Pressing (and holding) the Shift key, then pressing the first key (top-left corner) of the Enterpad simultaneously, will trigger the shortcut #121 (120+1), and so on up to shortcut #230.
The Shift key is #111 on the Enterpad. If you press it and then release it before pressing another Enterpad key, it will trigger shortcut #111.

The Shift key can also control 9 internal settings/commands on the Enterpad. The following sections explain how.
Adjust beep volume
With the Shift key, three keys can be used to set the beep volume.

The choices are HI for loud, MED for medium and LO for low. The most recent setting will be held in memory until changed, even if the power is turned off.
Load confirmation required
This setting is not relevant for the Enterpad used with ShortKeeper.
Its default setting (OFF) means that no confirmation will be required if you would like to turn your Enterpad into a standard Enterpad by way of the Enterpad's configuration software (EPConfig).
To set or unset this option, the keys OFF and ON in the Shift mode must be used. The most recent setting will remain in memory until you change it, even when the power is turned off.

Load confirmation or factory reset
The Load key in combination with the Shift key is not relevant for the Enterpad used with ShortKeeper.
If the “Load confirmation required” is switched ON, the Enterpad’s configuration software (EPConfig) will wait for this command (this is not a setting) to upload a new configuration to the memory of the Enterpad.
Using this command without the configuration software (EPConfig) linked to the Enterpad will simply freeze it for less than 5 seconds; OR, if you hold the load key until the status light begins flashing (about 5 seconds), it will reset the Enterpad to its factory settings.

How to toggle between layers 1 and 2
Layer 1 (default) is configured to trigger shortcuts #1 to #230. Selecting layer 2 enables the user to trigger 230 other shortcuts (#501 to #730).
By pressing 1 or 2 while holding down the Shift key, the user is able to select which layer is active. When the layer 2 is active, the status light on the Enterpad will be blinking. Layer 1 is the default layer when the Enterpad is powered on.

To empty the Enterpad buffer
The Esc key, when used in Shift mode, allows you to empty the Enterpad internal buffer (i.e., every Enterpad key pressed that is waiting to be processed will be cleared).

Tips
In order to ensure optimal use of your Enterpad, the overlay sheet must be correctly lined up with guides on the protective film. The thickness of the overlay sheet will influence the sensitivity of the keys on the Enterpad. Pressure should be applied near the center of the key.
Technical support
If you have any questions, comments, problems or suggestions concerning this product, write to:
Cedeq Industries Inc.
5193 Montee St-Hubert
St-Hubert, Quebec
J3Y 1V8, Canada
Tel: (450) 462-3988
Fax: (450) 462-3988
Web: cedeq.com
E-mail: support@cedeq.com
Notices
The Enterpad™ software copyright
Copyright © 2018-2024 by Cedeq Industries Inc. All rights reserved. The Enterpad software is protected by Canadian copyright laws and by International Agreements.
Limited warranties
Cedeq Industries guarantees the Enterpad against defects in material or workmanship for a period of one year from the date of purchase.
If the unit fails to work properly when used under normal conditions, we will repair or replace it free of charge. The defective Enterpad should be returned securely packaged and insured with postage prepaid and a copy of the sales slip from the vendor.
This warranty replaces all other warranties, either expressed or implied. Cedeq does not guarantee or make any representations regarding the use of the Enterpad in terms of conformity, accuracy, and durability.
Conformity
The Enterpad meets Canadian and American standards (ACNOR 108.8-M1983, code FCC, section 15-1989) with respect to electromagnetic radiation emissions for class A apparatus. Testing was done in conformity with ANSI C6.4-1991 procedure requirements.