Index
- Product overview
- Features
- Specifications
- System requirements
- Installation
- Layout of keys on the Enterpad and macro names
- How the EP2VBA linker works
- Internal operations of the Enterpad
- Tips
- Technical support
- Notices
Product overview
The Enterpad VBA saves precious time and prevents errors for those who need to run frequent VBA code (macro/sub). With unique features that allow it to work seamlessly with Excel and Word for Windows, the Enterpad VBA offers a level of reliability not possible with other input devices.
Take your VBA knowledge to a new level and develop the ultimate time-saving solution for your (or your customer's) business. The Enterpad's overlay templates make the integration process easy and the results professional, while providing ease of use to users.
Features
- Connects like a standard keyboard
- No special driver required
- Spill-proof; easy to keep clean
- Protection against static electricity
- Triggers VBA macros without using shortcut keys
- Can be used as a standalone unit or with a standard keyboard
- 120-key soft-touch keypad
- Up to 4 macros per key (can trigger 460 VBA macros)
- Buffer of 12 keys
- Adjustable beep volume (loud, medium, low and mute)
- Overlay templates available
- No external power supply required
- Overlay sheet cover included
Specifications
- Enterpad dimensions: 19.8 x 25.3 x 3.3 cm (7.8 x 9.96 x 1.3")
- Overlay sheet dimensions: 18.4 x 21.6 cm (7.25 x 8.5")
- Number of keys: 120, 10 X 12 matrix
- Membrane: Sealed with > 1 million contacts per key
- Membrane: Scratch-, dust- and spill-resistant
- Plug: USB
- Plug cable length: 1.8 m (6') shielded
- Approx. weight: 710 g (1 lb. 9 oz.)
- Approx. shipping weight: 910 g (2 lb.)
- Operating temperature range: 10 to 35 C (50 to 95 F)
- Storage temperature range: -5 to 50 C (23 to 122 F)
- Humidity range: 5-95 % RH non-condensing
- Current consumption: max. 17 mA = 1/10 watt
- CSA 108.8-M1983 / FCC class A (commercial)
- Available in Beige or Black
System requirements
- One available USB port
- Windows (10, 7, Vista)
- Microsoft Excel and/or Word 2010 (and above) with VBA & COM support
Installation
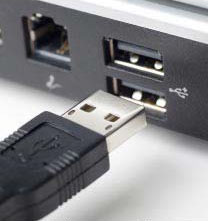 Connect the Enterpad to a free USB port on the computer. If a USB hub is being used, connect the Enterpad to the hub.
The operating system will automatically detect the Enterpad (normally < 15 seconds). Once detected, a notification will appear in the taskbar near the clock. The Enterpad will then be ready to use.
Use the Enterpad with our VBA linker program to connect it to the VBA code of the active applications (Excel or Word). The linker is a portable application, meaning there's no installation process. Just download the EP2VBA.zip file and extract its two digitally signed files (EP2VBA.exe and Enterpad.dll) into the same folder.
Running EP2VBA.exe will allow the Enterpad VBA to link to the active Excel or Word application. If you want to automatically run EP2VBA.exe when starting your computer, simply put a shortcut to it in the Startup folder.
Layout of keys on the Enterpad and macro names
Each key on the Enterpad triggers a corresponding macro name. Thus, key #1 triggers macro "EP_1", key #2 triggers macro "EP_2", and so on. For these to work, an Excel/Word document must be active, the macro name must exist, and the document must not be locked (e.g., when editing).
Key #1 is located at the top left corner and key #120 is at the bottom right corner. The Shift key on the Enterpad adds 120 to the key numbers. Thus, key #1 becomes key #121, and so on up to #230. This provides a way of triggering 110 additional VBA macros.
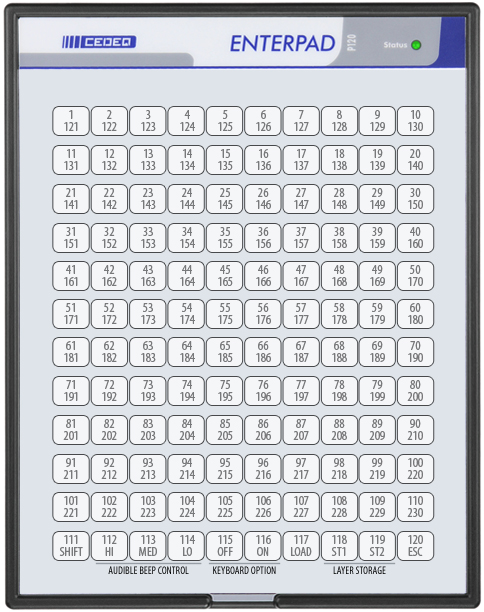
A macro can be triggered with the key #111, although it is also used as the Shift key. The macro will be triggered when the key is released, if another key has not been pressed first.
How the EP2VBA linker works
EP2VBA (the Enterpad-VBA linker) uses Microsoft’s Component Object Model (COM) technology to link the Enterpad to macros in Excel or Word.
When EP2VBA starts, it tries to establish a link with the Enterpad. If no Enterpad is connected or if the Enterpad is linked to another application (e.g. ShortKeeper, AutoHotkey), EP2VBA will terminate.
The linker associates each Enterpad key with a macro name (e.g. EP_1, EP_2). The macros must be located in a regular module of the active application. (Instead of EP2VBA, ShortKeeper can be used to trigger macros located in a regular module of the “personal.xlsm” workbook or in the “normal.dotm” template.)
The linker (and the Enterpad) will wait for a macro to finish running before launching a new one. If a macro fails (e.g., due to a problem, bug), resetting the VBA editor will allow the Enterpad to resume running requested macros. In the meantime, the Enterpad will continue receiving requests to execute macros (up to 12). Resetting the Enterpad will cancel all pending requests.
The linker was designed to meet the needs of an average user, and it is very easy to modify. We offer custom development services for those who need modifications to the standard parameters.
Internal operations of the Enterpad
By default, the 10 keys on the bottom row of the Enterpad are used like other keys. This chapter explains how (and why) they can be used to do double-duty.
Shift key
The Shift key on the Enterpad enables the user to trigger 110 more macros ("EP_121" to "EP_230"); Pressing (and holding) the Shift key, then pressing the first key (top-left corner) of the Enterpad simultaneously, will trigger the macro "EP_121" (120+1), and so on up to the macro "EP_230".
The Shift key is #111 on the Enterpad. If you press it and then release it before pressing another Enterpad key, it will trigger the macro "EP_111".

The Shift key can also control 9 internal settings/commands on the Enterpad. The following sections explain how.
Adjust beep volume
With the Shift key, three keys can be used to set the beep volume.

The choices are HI for loud, MED for medium and LO for low. The most recent setting will be held in memory until changed, even if the power is turned off.
Load confirmation required
This setting is not relevant for the Enterpad VBA operation.
Its default setting (OFF) means that no confirmation will be required if you would like to turn your Enterpad VBA into a standard Enterpad by way of the Enterpad's configuration software (EPConfig).
To set or unset this option, the keys OFF and ON in the Shift mode must be used. The most recent setting will remain in memory until you change it, even when the power is turned off.

Load confirmation or factory reset
The Load key in combination with the Shift key is not relevant for the Enterpad VBA operation.
If the “Load confirmation required” is switched ON, the Enterpad’s configuration software (EPConfig) will wait for this command (this is not a setting) to upload a new configuration to the memory of the Enterpad.
Using this command without the configuration software (EPConfig) linked to the Enterpad will simply freeze it for less than 5 seconds; OR, if you hold the load key until the status light begins flashing (about 5 seconds), it will reset the Enterpad to its factory settings.

How to toggle between layers 1 and 2
Layer 1 (default) is configured to trigger macros "EP_1" to "EP_230". Selecting layer 2 enables the user to trigger 230 other macros ("EP_501" to "EP_730").
By pressing 1 or 2 while holding down the Shift key, the user is able to select which layer is active. When the layer 2 is active, the status light on the Enterpad will be blinking. Layer 1 is the default layer when the Enterpad is powered on.

To empty the Enterpad buffer
The Esc key, when used in Shift mode, allows you to empty the Enterpad internal buffer (i.e., every Enterpad key pressed that is waiting to be processed will be cleared).

Tips
In order to ensure optimal use of your Enterpad, the overlay sheet must be correctly lined up with guides on the protective film. The thickness of the overlay sheet will influence the sensitivity of the keys on the Enterpad. Pressure should be applied near the center of the key.
Technical support
If you have any questions, comments, problems or suggestions concerning this product, write to:
Cedeq Industries Inc.
5193 Montee St-Hubert
St-Hubert, Quebec
J3Y 1V8, Canada
Tel: (450) 462-3988
Fax: (450) 462-3988
Web: cedeq.com
E-mail: support@cedeq.com
Notices
The Enterpad™ software copyright
Copyright © 2017-2024 by Cedeq Industries Inc. All rights reserved. The Enterpad software is protected by Canadian copyright laws and by International Agreements.
Limited warranties
Cedeq Industries guarantees the Enterpad against defects in material or workmanship for a period of one year from the date of purchase.
If the unit fails to work properly when used under normal conditions, we will repair or replace it free of charge. The defective Enterpad should be returned securely packaged and insured with postage prepaid and a copy of the sales slip from the vendor.
This warranty replaces all other warranties, either expressed or implied. Cedeq does not guarantee or make any representations regarding the use of the Enterpad in terms of conformity, accuracy, and durability.
Conformity
The Enterpad meets Canadian and American standards (ACNOR 108.8-M1983, code FCC, section 15-1989) with respect to electromagnetic radiation emissions for class A apparatus. Testing was done in conformity with ANSI C6.4-1991 procedure requirements.